CompletableFuture最佳实践
概览
CompletableFuture是JDK8对Future接口的增强
- 提供了函数式编程写法, 使代码简练, 语义清晰
- 默认使用forkJoinPool线程池, 无需手工维护线程
- completionStage接口, 提供了异步线程编排的能力, 支持链式编程
函数式接口
有且仅有一个抽象方法的接口为函数式接口, 可以使用@FunctionalInterface标识, 函数式接口能适用于函数式编程场景(Lambda).
常用的函数式接口
| 接口 | 说明 |
|---|---|
| Runnable | 无参无返回值 |
| Fuction<T,R> | 接收T类型参数, 返回R类型结果 |
Consumer<T> | 接收T类型参数, 无返回值 |
Predicate<T> | 接收T类型参数, 返回boolean类型结果 |
Supplier<T> | 无参, 返回T类型的结果 |
ComletableFuture使用
接口概览
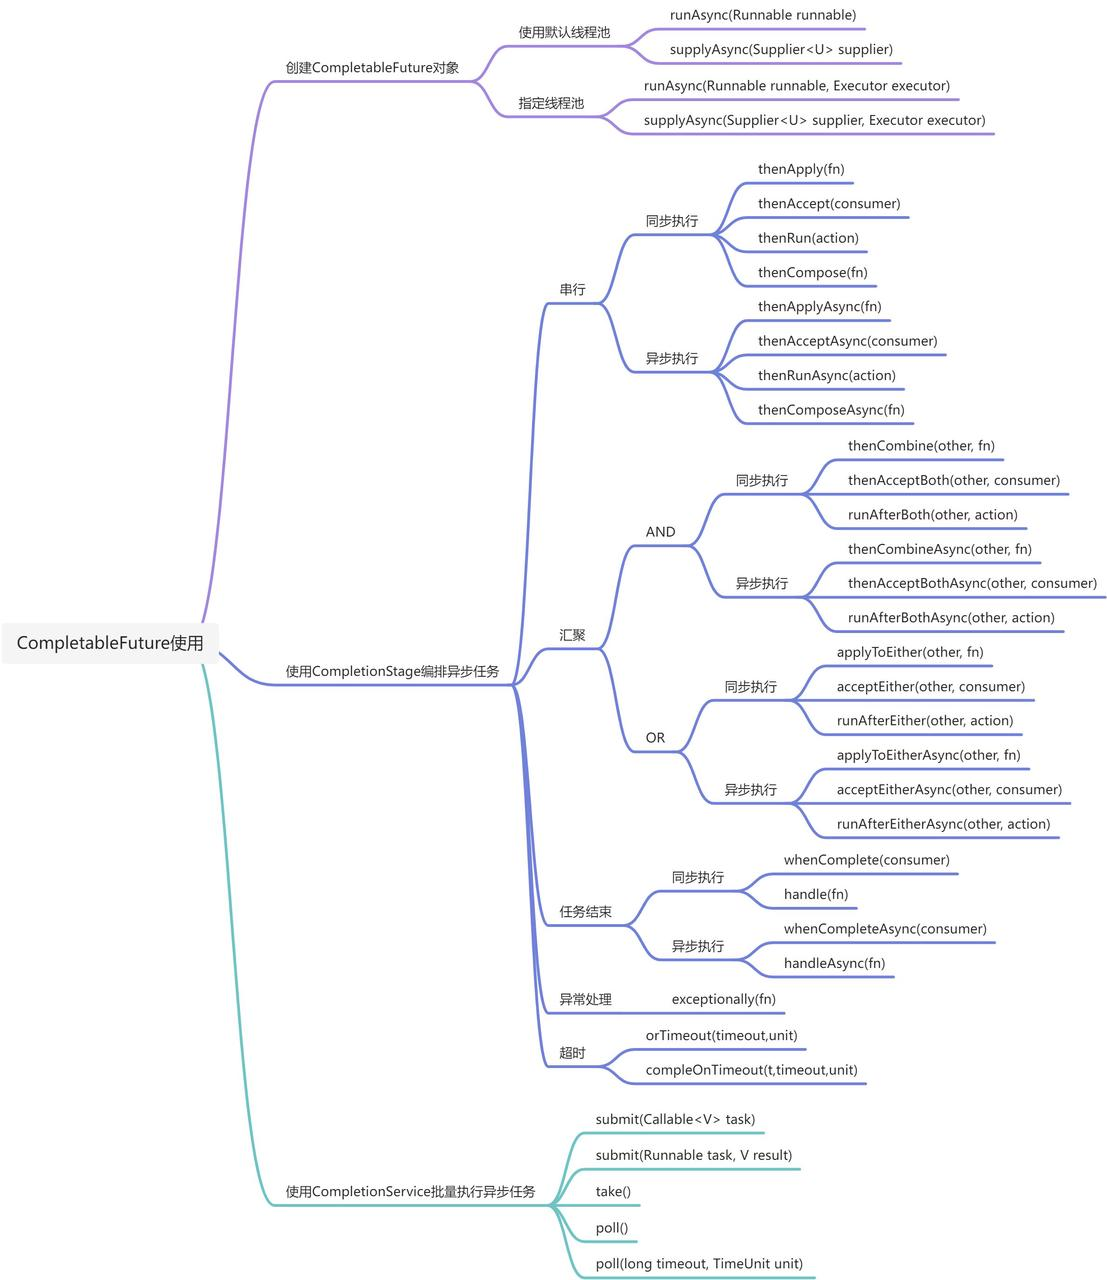
创建CompletableFuture对象
//使用默认线程池
static CompletableFuture<Void> runAsync(Runnable runnable)
static <U> CompletableFuture<U> supplyAsync(Supplier<U> supplier)
//可以指定线程池
static CompletableFuture<Void> runAsync(Runnable runnable, Executor executor)
static <U> CompletableFuture<U> supplyAsync(Supplier<U> supplier, Executor executor)- 带Async后缀的方法为异步执行, 下同
- Runnable接口无返回值, 而Supplier接口的get()是有返回值的
- 默认会使用 ForkJoinPool 线程池,这个线程池默认创建的线程数是 CPU 的核数
- 如果所有 CompletableFuture 共享一个线程池,那么一旦有任务执行一些很慢的 I/O 操作,就会导致线程池中所有线程都阻塞在 I/O 操作上,从而造成线程饥饿,进而影响整个系统的性能。所以,强烈建议根据不同的业务类型创建不同的线程池,以避免互相干扰
使用CompletionStage编排异步任务
串行关系
CompletionStage<R> thenApply(fn);
CompletionStage<R> thenApplyAsync(fn);
CompletionStage<Void> thenAccept(consumer);
CompletionStage<Void> thenAcceptAsync(consumer);
CompletionStage<Void> thenRun(action);
CompletionStage<Void> thenRunAsync(action);
CompletionStage<R> thenCompose(fn);
CompletionStage<R> thenComposeAsync(fn);- 使用上的区别为方法参数的函数式接口, 是否接收参数, 以及是否有返回值
- thenApply与thenCompose区别
- thenApply转换的是泛型中的类型, 相当于将CompletableFuture
<T>转换生成新的CompletableFuture<U> - thenCompose用来连接两个CompletableFuture,生成一个新的CompletableFuture
- thenApply转换的是泛型中的类型, 相当于将CompletableFuture
    public void serial(){
        CompletableFuture<String> f0 = CompletableFuture.supplyAsync(() -> "hello!");
        CompletableFuture<String> f1 = f0.thenApply(str -> str + "world!");
        System.out.println(f1.join()); // hello!world!

        CompletableFuture<String> f2 = f0
                .thenCompose(str -> CompletableFuture.supplyAsync(() -> str + "world!"));
        System.out.println(f2.join()); // hello!world!
    }
汇聚关系
AND
CompletionStage<R> thenCombine(other, fn);
CompletionStage<R> thenCombineAsync(other, fn);
CompletionStage<Void> thenAcceptBoth(other, consumer);
CompletionStage<Void> thenAcceptBothAsync(other, consumer);
CompletionStage<Void> runAfterBoth(other, action);
CompletionStage<Void> runAfterBothAsync(other, action);- 主要区别为方法参数函数式接口的不同
public void and(){
        CompletableFuture<String> f0 = CompletableFuture.supplyAsync(() -> "es recall!");
        CompletableFuture<String> f1 = CompletableFuture.supplyAsync(() -> "sm recall!");
        String res = f0.thenCombine(f1, (str1, str2) -> str1 + " & " + str2).join();
        System.out.println(res); // es recall! & sm recall!
    }
OR
CompletionStage applyToEither(other, fn);
CompletionStage applyToEitherAsync(other, fn);
CompletionStage acceptEither(other, consumer);
CompletionStage acceptEitherAsync(other, consumer);
CompletionStage runAfterEither(other, action);
CompletionStage runAfterEitherAsync(other, action);- 主要区别为方法参数函数式接口的不同
- OR在语义上理解为"最快返回", 拿最快返回的结果作为下一次任务的输入
 public void or() {
        CompletableFuture<String> f0 = CompletableFuture.supplyAsync(() -> {
            try {
                Thread.sleep(random.nextInt(3));
            } catch (InterruptedException e) {
                e.printStackTrace();
            }
            return "es recall!";
        });

        CompletableFuture<String> f1 = CompletableFuture.supplyAsync(() -> {
            try {
                Thread.sleep(random.nextInt(3));
            } catch (InterruptedException e) {
                e.printStackTrace();
            }
            return "sm recall!";
        });
        String res = f0.applyToEitherAsync(f1, str -> "fastest: " + str).join();
        System.out.println(res); // fastest: es recall! 或者 fastest: sm recall!
    }
异常处理
CompletionStage exceptionally(fn);- 相当于try{}catch{}中的catch{}, 支持链式编程
    public void exception(){
        CompletableFuture<Object> f0 = CompletableFuture.supplyAsync(() -> {
            throw new RuntimeException("hello!exception!");
        }).exceptionally(e -> {
            e.printStackTrace();
            return "exception happened";
        });
        System.out.println(f0.join()); //exception happened
    }
任务结束
CompletionStage<R> whenComplete(consumer);
CompletionStage<R> whenCompleteAsync(consumer);
CompletionStage<R> handle(fn);
CompletionStage<R> handleAsync(fn);- 相当于finally{}, 无论异常与否, 都会执行 consumer/fn 回调函数
    public void complete() {
        CompletableFuture<Object> f0 = CompletableFuture.supplyAsync(() -> {
            throw new RuntimeException("hello!exception!");
        }).whenComplete((str, e) -> {
            if (e != null) {
                e.printStackTrace();
            } else {
                System.out.println(str);
            }
        });
    }
超时
/**
 * java8中CompletableFuture异步处理超时的方法
 * <p>
 * Java 8 的 CompletableFuture 并没有 timeout 机制,虽然可以在 get 的时候指定 timeout,是一个同步堵塞的操作。怎样让 timeout 也是异步的呢?Java 8 内有内建的机
 * 制支持,一般的实现方案是启动一个 ScheduledThreadpoolExecutor 线程在 timeout 时间后直接调用 CompletableFuture.completeExceptionally(new TimeoutException()),
 * 然后用acceptEither() 或者 applyToEither 看是先计算完成还是先超时:
 * <p>
 * 在 java 9 引入了 orTimeout 和 completeOnTimeOut 两个方法支持 异步 timeout 机制:
 * <p>
 * public CompletableFuture orTimeout(long timeout, TimeUnit unit) : completes the CompletableFuture with a TimeoutException after the specified timeout has elapsed.
 * public CompletableFuture completeOnTimeout(T value, long timeout, TimeUnit unit) : provides a default value in the case that the CompletableFuture pipeline times out.
 * 内部实现上跟我们上面的实现方案是一模一样的,只是现在不需要自己实现了。
 * <p>
 * 实际上hystrix等熔断的框架,其实现线程Timeout之后就关闭线程,也是基于同样的道理,所以我们可以看到hystrix中会有一个Timer Thread
 * 参考: https://www.cnblogs.com/luliang888/p/14440118.html
 *
 * @author xinzhang
 * @version 2022/5/10
 */
public class CompletableFutureTimeout<T> {

    /**
     * Singleton delay scheduler, used only for starting and * cancelling tasks.
     */
    static final class Delayer {

        static ScheduledFuture<?> delay(Runnable command, long delay,
                TimeUnit unit) {
            return delayer.schedule(command, delay, unit);
        }

        static final class DaemonThreadFactory implements ThreadFactory {

            @Override
            public Thread newThread(Runnable r) {
                Thread t = new Thread(r);
                t.setDaemon(true);
                t.setName("CompletableFutureDelayScheduler");
                return t;
            }
        }

        static final ScheduledThreadPoolExecutor delayer;

        static {
            (delayer = new ScheduledThreadPoolExecutor(
                    1, new CompletableFutureTimeout.Delayer.DaemonThreadFactory())).
                    setRemoveOnCancelPolicy(true);
        }
    }

    /**
     * timeout时间后抛出TimeoutException
     */
    private static <T> CompletableFuture<T> timeoutAfter(long timeout, TimeUnit unit) {
        CompletableFuture<T> result = new CompletableFuture<T>();
        CompletableFutureTimeout.Delayer.delayer
                .schedule(() -> result.completeExceptionally(new TimeoutException()), timeout, unit);
        return result;
    }

    /**
     * future执行超时返回默认值
     */
    public static <T> CompletableFuture<T> completeOnTimeout(T t, CompletableFuture<T> future, long timeout,
            TimeUnit unit) {
        final CompletableFuture<T> timeoutFuture = timeoutAfter(timeout, unit);
        return future.applyToEither(timeoutFuture, Function.identity()).exceptionally((throwable) -> t);
    }

    /**
     * future执行超时抛出异常
     */
    public static <T> CompletableFuture<T> orTimeout(CompletableFuture<T> future, long timeout, TimeUnit unit) {
        final CompletableFuture<T> timeoutFuture = timeoutAfter(timeout, unit);
        return future.applyToEither(timeoutFuture, Function.identity());
    }
}
使用示例
    public void completeOnTimeout() {
        CompletableFuture<String> f0 = CompletableFuture.supplyAsync(() -> {
            try {
                Thread.sleep(2000);
            } catch (InterruptedException e) {
                e.printStackTrace();
            }
            return "executing 2000 ms";
        });

        CompletableFuture<String> within = CompletableFutureTimeout
                .completeOnTimeout("timeout default value", f0, 1, TimeUnit.SECONDS);
        System.out.println(within.join()); //timeout default value
    }
其他
// 显式返回执行异常
boolean completeExceptionally(Throwable ex)
// 全部完成
CompletableFuture<Void> allOf(CompletableFuture<?>... cfs)
// 其中一个完成即返回
CompletableFuture<Object> anyOf(CompletableFuture<?>... cfs)
使用CompletionService批量执行异步任务
CompletionService可以用于大量独立同构任务的异步批量执行, 可以submit提交任务, 通过take/poll获取任务Future结果
接口概览:
Future<V> submit(Callable<V> task);
Future<V> submit(Runnable task, V result);
Future<V> take() throws InterruptedException;
Future<V> poll();
Future<V> poll(long timeout, TimeUnit unit) throws InterruptedException;- 提交的任务互相独立执行, 谁先完成先返回
- take()、poll() 都是从阻塞队列中获取并移除一个元素; 它们的区别在于如果阻塞队列是空的,那么调用 take() 方法的线程会被阻塞,而 poll() 方法会返回 null 值
CompletionService接口的实现是ExecutorCompletionService, 其实现原理是其内部维护了一个阻塞队列, 该阻塞队列用来保存任务执行结果的Future对象
ExecutorCompletionService构造方法
// 如果不指定 completionQueue,那么默认会使用无界的 LinkedBlockingQueue
ExecutorCompletionService(Executor executor)
ExecutorCompletionService(Executor executor,BlockingQueue<Future<V>> completionQueue)
示例
 private CompletionService<String> completionService = new ExecutorCompletionService<>(
            Executors.newFixedThreadPool(3));

    public void batchExecute() throws ExecutionException, InterruptedException {
        completionService.submit(() -> "hello!");
        completionService.submit(() -> "world!");
        completionService.submit(() -> "nice!");

        for (int i = 0; i < 3; i++) {
            System.out.println(completionService.take().get());
        }
    }
高级主题
线程池配置
/**
 * ThreadPoolConfig
 *
 * @author xinzhang
 * @version 2022/5/10
 */
@Configuration
public class ThreadPoolConfig {

    @Bean
    public ThreadPoolExecutorFactoryBean bizExecutor() {
        ThreadPoolExecutorFactoryBean factoryBean = new ThreadPoolExecutorFactoryBean();
        // 核心线程数,一直存活
        factoryBean.setCorePoolSize(5);
        // 当线程数大于或等于核心线程,且任务队列已满时,线程池会创建新的线程,直到线程数量达到maxPoolSize。
        // 如果线程数已等于maxPoolSize,且任务队列已满,则已超出线程池的处理能力,线程池会拒绝处理任务而抛出异常。
        factoryBean.setMaxPoolSize(10);
        // 任务队列容量
        factoryBean.setQueueCapacity(20);
        // 当线程空闲时间达到setKeepAliveSeconds,该线程会退出,直到线程数量等于corePoolSize。
        factoryBean.setKeepAliveSeconds(60);
        factoryBean.setThreadNamePrefix("biz-task");
        //(1) 默认的ThreadPoolExecutor.AbortPolicy   处理程序遭到拒绝将抛出运行时RejectedExecutionException;
        //(2) ThreadPoolExecutor.CallerRunsPolicy 线程调用运行该任务的 execute 本身。此策略提供简单的反馈控制机制,能够减缓新任务的提交速度
        //(3) ThreadPoolExecutor.DiscardPolicy  不能执行的任务将被删除;
        //(4) ThreadPoolExecutor.DiscardOldestPolicy  如果执行程序尚未关闭,则位于工作队列头部的任务将被删除,然后重试执行程序(如果再次失败,则重复此过程)。
        factoryBean.setRejectedExecutionHandler(new ThreadPoolExecutor.CallerRunsPolicy());
        return factoryBean;
    }

}- 线程数量
- CPU密集型 : 多线程本质上是提升多核 CPU 的利用率, ** 理论上“线程的数量 =CPU 核数”就是最合适的** 。不过 在工程上,线程的数量一般会设置为“CPU 核数 +1” ,这样的话,当线程因为偶尔的内存页失效或其他原因导致阻塞时,这个额外的线程可以顶上,从而保证 CPU 的利用率
- I/O密集型: 最佳线程数 =CPU 核数 * [ 1 +(I/O 耗时 / CPU 耗时)]
- **不建议使用 Java 并发包中的静态工厂类Executors ** , 原因是:Executors 提供的很多方法默认使用的都是无界的 LinkedBlockingQueue,高负载情境下,无界队列很容易导致 OOM,而 OOM 会导致所有请求都无法处理,这是致命问题。所以强烈建议使用有界队列。
- 默认拒绝策略要慎重使用 , 默认的拒绝策略会 throw RejectedExecutionException 这是个运行时异常,对于运行时异常编译器并不强制 catch 它,所以开发人员很容易忽略, 在实际工作中,自定义的拒绝策略往往和降级策略配合使用。
- 注意异常处理 , 如果任务在执行的过程中出现运行时异常,会导致执行任务的线程终止;不过,最致命的是任务虽然异常了,但是你却获取不到任何通知,这会让你误以为任务都执行得很正常。最稳妥和简单的方案还是捕获所有异常并按需处理, 如下示例代码
try {
  //业务逻辑
} catch (RuntimeException x) {
  //按需处理
} catch (Throwable x) {
  //按需处理
}
使用示例
    @Autowired
    private ExecutorService bizExecutor;

    public void runWithExecutor() {
        for (int i = 0; i < 10; i++) {
            CompletableFuture.runAsync(() -> {
                System.out.println(Thread.currentThread().getName()+"===========>hello!world!");
            }, bizExecutor);
        }
    }
上下文
TransmittableThreadLocal
建议阅读: https://github.com/alibaba/transmittable-thread-local
TransmittableThreadLocal(TTL):在使用线程池等会池化复用线程的执行组件情况下,提供ThreadLocal值的传递功能,解决异步执行时上下文传递的问题
原理浅析: https://cloud.tencent.com/developer/article/1484420
使用方式同传统的ThreadLocal, 父子线程传值示例:
 public void transferCtx() {
        TransmittableThreadLocal<String> ctx = new TransmittableThreadLocal<>();
        ctx.set("hello!world!");

        new Thread(() -> System.out.println(ctx.get())).run(); // hello!world!
    }
具体在CompletableFuture使用场景上:
方案一: 使用Java Agent修饰JDK线程池实现类
在Java的启动参数加上:-javaagent:path/to/transmittable-thread-local-2.x.y.jar
方案二(推荐): CompletableFuture使用自定义线程池, 并使用TtlExecutors修饰
@Configuration
public class ThreadPoolConfig {

    @Bean
    public ThreadPoolExecutorFactoryBean bizExecutor() {
        ThreadPoolExecutorFactoryBean factoryBean = new ThreadPoolExecutorFactoryBean();
        // 核心线程数,一直存活
        factoryBean.setCorePoolSize(5);
        // 当线程数大于或等于核心线程,且任务队列已满时,线程池会创建新的线程,直到线程数量达到maxPoolSize。
        // 如果线程数已等于maxPoolSize,且任务队列已满,则已超出线程池的处理能力,线程池会拒绝处理任务而抛出异常。
        factoryBean.setMaxPoolSize(10);
        // 任务队列容量
        factoryBean.setQueueCapacity(20);
        // 当线程空闲时间达到setKeepAliveSeconds,该线程会退出,直到线程数量等于corePoolSize。
        factoryBean.setKeepAliveSeconds(60);
        factoryBean.setThreadNamePrefix("biz-task");
        //(1) 默认的ThreadPoolExecutor.AbortPolicy   处理程序遭到拒绝将抛出运行时RejectedExecutionException;
        //(2) ThreadPoolExecutor.CallerRunsPolicy 线程调用运行该任务的 execute 本身。此策略提供简单的反馈控制机制,能够减缓新任务的提交速度
        //(3) ThreadPoolExecutor.DiscardPolicy  不能执行的任务将被删除;
        //(4) ThreadPoolExecutor.DiscardOldestPolicy  如果执行程序尚未关闭,则位于工作队列头部的任务将被删除,然后重试执行程序(如果再次失败,则重复此过程)。
        factoryBean.setRejectedExecutionHandler(new ThreadPoolExecutor.CallerRunsPolicy());
        return factoryBean;
    }

    @Bean
    public ExecutorService ttlExecutor(ExecutorService bizExecutor) {
        return TtlExecutors.getTtlExecutorService(bizExecutor);
    }

}
使用示例
 @Autowired
    private ExecutorService ttlExecutor;

    public String decorateExecutor() {
        TransmittableThreadLocal<Long> ctx = new TransmittableThreadLocal<>();
        try {
            Thread.sleep(100);
        } catch (InterruptedException e) {
            e.printStackTrace();
        }
        ctx.set(System.currentTimeMillis());
        return CompletableFuture.supplyAsync(() -> Thread.currentThread().getName() + "=====>" + ctx.get(),
                ttlExecutor).join();
    }
测试
 @Test
    public void testDecorateExecutor() {
        for (int i = 0; i < 10; i++) {
            System.out.println(demo.decorateExecutor());
        }
    }

==========================
15:32:55.649 DEBUG [main] o.springframework.test.context.cache - Spring test ApplicationContext cache statistics: [DefaultContextCache@6f1d799 size = 1, maxSize = 32, parentContextCount = 0, hitCount = 2, missCount = 1]
biz-task1=====>1652167976179
biz-task2=====>1652167976279
biz-task3=====>1652167976379
biz-task4=====>1652167976489
biz-task5=====>1652167976599
biz-task1=====>1652167976699
biz-task2=====>1652167976809
biz-task3=====>1652167976919
biz-task4=====>1652167977019
biz-task5=====>1652167977129
Logback的MDC
方案一: logback-mdc-ttl
建议阅读: https://github.com/ofpay/logback-mdc-ttl
实现上集成使用了Transmittable ThreadLocal(TTL) :在使用线程池等会缓存线程的组件情况下,提供ThreadLocal值的传递功能,解决异步执行时上下文传递的问题。支持JDK 9/8/7/6。
方案二(推荐): 实现MDCAdaper接口, 使用TransmittableThreadLocal替换默认InheritableThreadLocal实现
- TtlMDCAdapter仅将2.4.0版本logback的BasicMDCAdapter中的InheritableThreadLocal替换为TransmittableThreadLocal
package org.slf4j;

import com.alibaba.ttl.TransmittableThreadLocal;
import java.util.HashMap;
import java.util.Map;
import java.util.Set;
import org.slf4j.spi.MDCAdapter;

/**
 * TtlMDCAdapter
 *
 * @author xinzhang
 * @version 2022/5/10
 */
public class TtlMDCAdapter implements MDCAdapter {

    private TransmittableThreadLocal<Map<String, String>> transmittableThreadLocal = new TransmittableThreadLocal<Map<String, String>>() {
        @Override
        protected Map<String, String> childValue(Map<String, String> parentValue) {
            return parentValue == null ? null : new HashMap<>(parentValue);
        }
    };

    public TtlMDCAdapter() {
    }

    @Override
    public void put(String key, String val) {
        if (key == null) {
            throw new IllegalArgumentException("key cannot be null");
        } else {
            Map<String, String> map = this.transmittableThreadLocal.get();
            if (map == null) {
                map = new HashMap<>();
                this.transmittableThreadLocal.set(map);
            }

            map.put(key, val);
        }
    }

    @Override
    public String get(String key) {
        Map<String, String> map = this.transmittableThreadLocal.get();
        return map != null && key != null ? map.get(key) : null;
    }

    @Override
    public void remove(String key) {
        Map<String, String> map = this.transmittableThreadLocal.get();
        if (map != null) {
            map.remove(key);
        }

    }

    @Override
    public void clear() {
        Map<String, String> map = this.transmittableThreadLocal.get();
        if (map != null) {
            map.clear();
            this.transmittableThreadLocal.remove();
        }

    }

    public Set<String> getKeys() {
        Map<String, String> map = this.transmittableThreadLocal.get();
        return map != null ? map.keySet() : null;
    }

    @Override
    public Map<String, String> getCopyOfContextMap() {
        Map<String, String> oldMap = this.transmittableThreadLocal.get();
        return oldMap != null ? new HashMap<>(oldMap) : null;
    }

    @Override
    public void setContextMap(Map<String, String> contextMap) {
        this.transmittableThreadLocal.set(new HashMap<>(contextMap));
    }
}- 实例化, 注意包结构固定为org.slf4j.impl , 通过MDC#bwCompatibleGetMDCAdapterFromBinder()实例化
package org.slf4j.impl;

import org.slf4j.TtlMDCAdapter;
import org.slf4j.spi.MDCAdapter;

/**
 * StaticMDCBinder
 *
 * @author xinzhang
 * @version 2022/5/10
 */
public class StaticMDCBinder {

    public static final StaticMDCBinder SINGLETON = new StaticMDCBinder();

    private StaticMDCBinder() {
    }

    public MDCAdapter getMDCA() {
        return new TtlMDCAdapter();
    }

    public String getMDCAdapterClassStr() {
        return TtlMDCAdapter.class.getName();
    }
}
使用示例
 @Autowired
    private ExecutorService ttlExecutor;

    public String transferMDC() {
        try {
            Thread.sleep(100);
        } catch (InterruptedException e) {
            e.printStackTrace();
        }
        MDC.put("time", String.valueOf(System.currentTimeMillis()));
        return CompletableFuture.supplyAsync(() -> Thread.currentThread().getName() + "=====>" + MDC.get("time")
        ,ttlExecutor).join();
    }
测试
 @Test
    public void testTransferMDC() {
        for (int i = 0; i < 10; i++) {
            System.out.println(demo.transferMDC());
        }
    }
=========================
biz-task1=====>1652172234438
biz-task2=====>1652172234548
biz-task3=====>1652172234658
biz-task4=====>1652172234758
biz-task5=====>1652172234858
biz-task1=====>1652172234968
biz-task2=====>1652172235078
biz-task3=====>1652172235178
biz-task4=====>1652172235288
biz-task5=====>1652172235398
Hystrix线程池隔离模式
参考: https://zhuanlan.zhihu.com/p/273292662
hystrix默认为线程池隔离模式, 会复用线程, 导致上下文传递出现问题
示例
serviceA-->serviceB
1.feign集成了hystrix, 在配置中打开开关即可, 将核心线程数限制为3

# hystrix
feign.hystrix.enabled=true
hystrix.threadpool.default.coreSize=3
hystrix.threadpool.default.maxQueueSize=50
# 没达到maxQueueSize, 但达到queueSizeRejectionThreshold值, 请求也会被拒绝, 默认为5
hystrix.threadpool.default.queueSizeRejectionThreshold=20

2.serviceA调用serviceB
(TtlContext为TransmittableThreadLocal实现的上下文)

 @GetMapping
    public void accessServiceB() {
        long now = System.currentTimeMillis();
        System.out.println(Thread.currentThread().getName() + "设置上下文=======>" + now);
        // 设置上下文
        TtlContext.put(now);
        // 业务操作, 调用serviceB
        serviceBFeignClient.hello();
        // 请求结束, 清除上下文
        TtlContext.clear();
    }

3.在serviceB的feignClient设置拦截器, 获取上下文
@Component
public class FeignInterceptor implements RequestInterceptor {

    @Override
    public void apply(RequestTemplate requestTemplate) {
        System.out.println(Thread.currentThread().getName() + "获取上下文=======>" + TtlContext.get());
    }
}

3.用jmeter以10个并发一次访问serviceA, 使hystrix线程复用, 日志如下:
===========================可以看到对应不上, hystrix中复用的线程上下文也并未清除
http-nio-9001-exec-2设置上下文=======>1652180438894
http-nio-9001-exec-1设置上下文=======>1652180438894
http-nio-9001-exec-3设置上下文=======>1652180438894
http-nio-9001-exec-4设置上下文=======>1652180438964
http-nio-9001-exec-5设置上下文=======>1652180439064
hystrix-service-b-2获取上下文=======>1652180438894
hystrix-service-b-1获取上下文=======>1652180439064
hystrix-service-b-3获取上下文=======>1652180438964
http-nio-9001-exec-6设置上下文=======>1652180439154
http-nio-9001-exec-7设置上下文=======>1652180439254
http-nio-9001-exec-8设置上下文=======>1652180439354
http-nio-9001-exec-9设置上下文=======>1652180439454
http-nio-9001-exec-10设置上下文=======>1652180439564
hystrix-service-b-1获取上下文=======>1652180439064
hystrix-service-b-2获取上下文=======>1652180438894
hystrix-service-b-3获取上下文=======>1652180438964
hystrix-service-b-2获取上下文=======>1652180438894
hystrix-service-b-3获取上下文=======>1652180438964

4.再发起单次请求, 可以观察的更明显, hystrix获取的上下文为之前请求遗留的数据
http-nio-9001-exec-1设置上下文=======>1652180593488
hystrix-service-b-1获取上下文=======>1652180439064
方案一(推荐): 使用Hystrix插件机制, 用TtlCallable包装线程
- 此方案的本质是针对HystrixCommand的run()方法(也就是加了@HystrixCommand注解的业务方法)拦截处理, 但它可能会超时或失败,那么就会去执行fallback方法,如果在 fallback方法中也想共享相关上下文信息,这时就无法覆盖到这种场景了
@Slf4j
@Configuration
public class HystrixPluginConfiguration {

    @PostConstruct
    public void initHystrixPlugins() {
        try {
            HystrixConcurrencyStrategy target = new TtlHystrixConcurrencyStrategy();
            HystrixConcurrencyStrategy strategy = HystrixPlugins.getInstance().getConcurrencyStrategy();
            if (strategy instanceof TtlHystrixConcurrencyStrategy) {
                return;
            }
            HystrixCommandExecutionHook commandExecutionHook = HystrixPlugins
                    .getInstance().getCommandExecutionHook();
            HystrixEventNotifier eventNotifier = HystrixPlugins.getInstance()
                    .getEventNotifier();
            HystrixMetricsPublisher metricsPublisher = HystrixPlugins.getInstance()
                    .getMetricsPublisher();
            HystrixPropertiesStrategy propertiesStrategy = HystrixPlugins.getInstance()
                    .getPropertiesStrategy();

            if (log.isDebugEnabled()) {
                log.debug("Current Hystrix plugins configuration is ["
                        + "concurrencyStrategy [" + target + "]," + "eventNotifier ["
                        + eventNotifier + "]," + "metricPublisher [" + metricsPublisher + "],"
                        + "propertiesStrategy [" + propertiesStrategy + "]," + "]");
                log.debug("Registering Ttl Hystrix Concurrency Strategy.");
            }

            HystrixPlugins.reset();
            HystrixPlugins.getInstance().registerConcurrencyStrategy(target);
            HystrixPlugins.getInstance()
                    .registerCommandExecutionHook(commandExecutionHook);
            HystrixPlugins.getInstance().registerEventNotifier(eventNotifier);
            HystrixPlugins.getInstance().registerMetricsPublisher(metricsPublisher);
            HystrixPlugins.getInstance().registerPropertiesStrategy(propertiesStrategy);
        } catch (Exception e) {
            log.error("Failed to register Ttl Hystrix Concurrency Strategy", e);
        }
    }

    /**
     * 使用TransmittableThreadLocal修饰Callable, 以实现线程池中上下文的正确传递
     */
    public static class TtlHystrixConcurrencyStrategy extends HystrixConcurrencyStrategy {

        @Override
        public <T> Callable<T> wrapCallable(Callable<T> callable) {
            return TtlCallable.get(callable);
        }
    }
}
测试: 同样以10个并发一次访问serviceA, 日志如下, 上下文一一对应
http-nio-9001-exec-3设置上下文=======>1652180858093
http-nio-9001-exec-1设置上下文=======>1652180858093
http-nio-9001-exec-2设置上下文=======>1652180858173
http-nio-9001-exec-4设置上下文=======>1652180858273
hystrix-service-b-1获取上下文=======>1652180858093
hystrix-service-b-3获取上下文=======>1652180858093
hystrix-service-b-2获取上下文=======>1652180858173
http-nio-9001-exec-5设置上下文=======>1652180858376
http-nio-9001-exec-6设置上下文=======>1652180858472
http-nio-9001-exec-8设置上下文=======>1652180858566
http-nio-9001-exec-9设置上下文=======>1652180858673
http-nio-9001-exec-7设置上下文=======>1652180858773
hystrix-service-b-2获取上下文=======>1652180858376
hystrix-service-b-1获取上下文=======>1652180858472
hystrix-service-b-3获取上下文=======>1652180858273
hystrix-service-b-2获取上下文=======>1652180858673
hystrix-service-b-1获取上下文=======>1652180858566
hystrix-service-b-3获取上下文=======>1652180858773
http-nio-9001-exec-10设置上下文=======>1652180858883
hystrix-service-b-3获取上下文=======>1652180858883

再次单次请求, 观察得更清晰
http-nio-9001-exec-1设置上下文=======>1652180929774
hystrix-service-b-1获取上下文=======>1652180929774
方案二: 使用HystrixRequestContext上下文
参考: https://www.freesion.com/article/9286656341/
此方案只有使用HystrixContextRunnable或HystrixContextCallable创建线程才能在线程间传递数据, 在这里不过多介绍
业务案例
编排异步任务实现并行召回
搜索业务有如下的并行召回流程, 下面我们用CompletableFuture模拟实现, 其中关键的mm, es, sm的并行召回
/**
 * Search
 *
 * @author xinzhang
 * @version 2022/5/9
 */
@Slf4j
@Component
public class Search {

    @Autowired
    private ExecutorService ttlExecutor;

    public List<Article> recall(String query) {
        long start = System.currentTimeMillis();
        // 设置UUID作为traceId
        TransmittableThreadLocal<String> ctx = new TransmittableThreadLocal<>();
        String traceId = UUID.fastUUID().toString();
        System.out.println("=====================" + traceId + "===================");
        ctx.set(traceId);

        CompletableFuture<List<Article>> smRecall = CompletableFuture.supplyAsync(() -> {
            // 子线程打印traceId
            System.out.println(Thread.currentThread().getName()
                    + "=====>smRecall executing, timeout<1s, ==>traceId: " + ctx.get());
            randomSleepWithIn5Seconds(ctx.get());
            return ArticleFactory.randomGenerate(query, "sm");
        }, ttlExecutor);
        // 设置超时以及异常处理
        CompletableFuture<List<Article>> smRecallTimeOut = CompletableFutureTimeout
                .orTimeout(smRecall, 1, TimeUnit.SECONDS)
                .exceptionally(e -> {
                    System.out.println(String.format("smRecall failed, e: %s", e.getMessage()));
                    return Collections.emptyList();
                });

        CompletableFuture<List<Article>> mmRecall = CompletableFuture.supplyAsync(() -> {
            System.out.println(Thread.currentThread().getName()
                    + "=====> mmRecall executing, timeout<2s, ==>traceId: " + ctx.get());
            randomSleepWithIn5Seconds(ctx.get());
            return ArticleFactory.randomGenerate(query, "mm");
        }, ttlExecutor);
        CompletableFuture<List<Article>> mmRecallTimeOut = CompletableFutureTimeout
                .orTimeout(mmRecall, 2, TimeUnit.SECONDS)
                .exceptionally(e -> {
                    System.out.println(String.format("mmRecall failed, e: %s", e.getMessage()));
                    return Collections.emptyList();
                });

        CompletableFuture<List<Article>> esRecall = CompletableFuture.supplyAsync(() -> {
            System.out.println(Thread.currentThread().getName()
                    + "=====>esRecall executing, timeout<3s, ==>traceId: " + ctx.get());
            randomSleepWithIn5Seconds(ctx.get());
            return ArticleFactory.randomGenerate(query, "es");
        }, ttlExecutor);
        CompletableFuture<List<Article>> esRecallTimeOut = CompletableFutureTimeout
                .orTimeout(esRecall, 3, TimeUnit.SECONDS)
                .exceptionally(e -> {
                    System.out.println(String.format("esRecall failed, e: %s", e.getMessage()));
                    return Collections.emptyList();
                });

        CompletableFuture<List<Article>> allDone = CompletableFuture
                .allOf(mmRecallTimeOut, esRecallTimeOut, smRecallTimeOut).thenApply(v -> {
                    List<Article> all = new ArrayList<>();
                    all.addAll(mmRecallTimeOut.join());
                    all.addAll(esRecallTimeOut.join());
                    all.addAll(smRecallTimeOut.join());
                    return all;
                });
        List<Article> list = allDone.join();
        // 打印总耗时, 因为es, sm, mm超时时间最长为3s, 因此总耗时一定<=3s
        System.out.println("recall total: " + (System.currentTimeMillis() - start) / 1000 + "s");
        System.out.println(list);
        return list;
    }

    /**
     * 随机睡眠0~5s
     */
    public void randomSleepWithIn5Seconds(String traceId) {
        Random random = new Random();
        int time = random.nextInt(5000) - 1;
        try {
            System.out.println(Thread.currentThread().getName() + "睡眠" + time / 1000 + "s, ==>traceId: " + traceId);
            Thread.sleep(time);
        } catch (InterruptedException e) {
            e.printStackTrace();
        }
    }
}
可以看到, 超时处理以及异常处理等API的调用较为固定, 可以抽象出一个并行处理器来简化代码
package com.pingan.lcloud.cf;

import com.pingan.lcloud.jdk.CompletableFutureTimeout;
import java.util.ArrayList;
import java.util.List;
import java.util.concurrent.CompletableFuture;
import java.util.concurrent.ExecutorService;
import java.util.concurrent.TimeUnit;
import java.util.function.Function;
import java.util.function.Supplier;
import java.util.stream.Collectors;

/**
 * ParallelExecutor
 * 并行执行器, 通过submit(), 提交任务, 可设置超时(超时会抛出TimeoutException)以及异常处理器,
 * 通过execute()并行执行并获取结果
 *
 * @author xinzhang
 * @version 2022/5/11
 */
public class ParallelExecutor<T> {

    private final List<CompletableFuture<T>> tasks = new ArrayList<>();
    private ExecutorService executorService;

    public ParallelExecutor(ExecutorService executorService) {
        this.executorService = executorService;
    }

    /**
     * 任务提交, 超时或异常返回null
     */
    public void submit(Supplier<T> task, long timeout, TimeUnit unit) {
        CompletableFuture<T> future = CompletableFuture.supplyAsync(task, executorService);
        CompletableFuture<T> timeoutFuture = CompletableFutureTimeout.orTimeout(future, timeout, unit)
                .exceptionally(e -> null);
        tasks.add(timeoutFuture);
    }

    /**
     * 任务提交
     *
     * @param task 需要执行的任务
     * @param timeout 超时时间
     * @param unit 超时单位
     * @param errorHandler 异常处理器
     */
    public void submit(Supplier<T> task, long timeout, TimeUnit unit, Function<Throwable, ? extends T> errorHandler) {
        CompletableFuture<T> future = CompletableFuture.supplyAsync(task, executorService);
        CompletableFuture<T> timeoutFuture = CompletableFutureTimeout.orTimeout(future, timeout, unit)
                .exceptionally(errorHandler);
        tasks.add(timeoutFuture);
    }

    /**
     * 任务执行
     *
     * @return 结果
     */
    public List<T> execute() {
        return CompletableFuture.allOf(tasks.toArray(new CompletableFuture[]{}))
                .thenApply(v -> tasks.stream().map(CompletableFuture::join).collect(Collectors.toList())).join();
    }
}
使用
/**
 * Search
 *
 * @author xinzhang
 * @version 2022/5/9
 */
@Slf4j
@Component
public class SearchV2 {

    @Autowired
    private ExecutorService ttlExecutor;

    /**
     * 召回错误处理器
     */
    static class RecallErrorHandler implements Function<Throwable, List<Article>> {

        @Override
        public List<Article> apply(Throwable t) {
            System.out.println(String.format("recall failed, e: %s", t.getMessage()));
            return Collections.emptyList();
        }
    }

    public List<Article> recall(String query) {
        long start = System.currentTimeMillis();
        // 设置UUID作为traceId
        TransmittableThreadLocal<String> ctx = new TransmittableThreadLocal<>();
        String traceId = UUID.fastUUID().toString();
        System.out.println("=====================" + traceId + "===================");
        ctx.set(traceId);

        // 定义错误处理器
        RecallErrorHandler errorHandler = new RecallErrorHandler();

        // 定义并行执行器
        ParallelExecutor<List<Article>> parallelExecutor = new ParallelExecutor<>(ttlExecutor);
        parallelExecutor.submit(() -> {
            // 子线程打印traceId
            System.out.println(Thread.currentThread().getName()
                    + "=====>smRecall executing, timeout<1s, ==>traceId: " + ctx.get());
            randomSleepWithIn5Seconds(ctx.get());
            return ArticleFactory.randomGenerate(query, "sm");
        }, 1, TimeUnit.SECONDS, errorHandler);

        parallelExecutor.submit(() -> {
            // 子线程打印traceId
            System.out.println(Thread.currentThread().getName()
                    + "=====>mmRecall executing, timeout<2s, ==>traceId: " + ctx.get());
            randomSleepWithIn5Seconds(ctx.get());
            return ArticleFactory.randomGenerate(query, "mm");
        }, 2, TimeUnit.SECONDS, errorHandler);

        parallelExecutor.submit(() -> {
            // 子线程打印traceId
            System.out.println(Thread.currentThread().getName()
                    + "=====>esRecall executing, timeout<3s, ==>traceId: " + ctx.get());
            randomSleepWithIn5Seconds(ctx.get());
            return ArticleFactory.randomGenerate(query, "es");
        }, 3, TimeUnit.SECONDS, errorHandler);

        List<List<Article>> res = parallelExecutor.execute();
        // 将list合并
        List<Article> list = res.stream().flatMap(Collection::stream).collect(Collectors.toList());

        // 打印总耗时, 因为es, sm, mm超时时间最长为3s, 因此总耗时一定<=3s
        System.out.println("recall total: " + (System.currentTimeMillis() - start) / 1000 + "s");
        System.out.println(list);
        return list;
    }

    /**
     * 随机睡眠0~5s
     */
    public void randomSleepWithIn5Seconds(String traceId) {
        Random random = new Random();
        int time = random.nextInt(5000) - 1;
        try {
            System.out.println(Thread.currentThread().getName() + "睡眠" + time / 1000 + "s, ==>traceId: " + traceId);
            Thread.sleep(time);
        } catch (InterruptedException e) {
            e.printStackTrace();
        }
    }
}